
instalace
Program content (Marklar directory):
- /lib (used libraries)
- /win32com (libraries for com)
- config.ini (language and instrument configuration)
- db.txt (instructions for database initialization)
- logo.ico (startup icon)
- marklar.jar (program itself)
- start.bat (starting script)
- opencv_java300.dll (libraries for reading cammera images)
- log4j-application.log (will be created automatically after first startup. Program log)
Instalation:
- MySQL server (mysql-installer-community-5.7.19.0.msi)
- Instalation run as Server Only
- Config Type: Server Machine
- Check the port number is correctt TCP/IP Port Number: 3306
- Root Password: root
- Check Start MySQL Server at System Startup
- When installation is finished, MySQL starts automatically
- Next, empty database must be created: DB Name: marklar_lbm, DB Encoding: utf8, DB Collation: utf8_czech_ci. A description, how this database can be created, follows.
- Run MySQL server through command line: "C:\Program Files\MySQL\MySQL Server 5.7\bin\mysql.exe” -u root -p
- Enter pasword for root user: root
- MySQL console should be started.
- Type the following command: CREATE DATABASE `marklar_lbm` CHARACTER SET utf8 COLLATE utf8_czech_ci;
- Check, that database is created: SHOW DATABASES;
- 32bit Java JDK 8 (jdk-8u144-windows-i586.exe)
- UEye camera drivers (uEye64_48002_WHQL.exe)
- Only drivers for USB camera must be installed
- LBM instalation
- There is no install wizzard. Marklar/ directory must be coppied into C:/Program Files/ directory
- In newly created directory (C:/Program Files/Marklar/ change user privileges - allow users to change files because of application logging.
- Preparation of COM libraries
- Instructions are described in file Markalr/win32com/README.txt
- Edit Marklar/config.ini
- lang=EN (set LBM language to english)
- restApi=false (restApi is not required. This feature is used in advanced applications, where remote controll is demanded)
- calculator=BY_NORM_CALCULATOR (evaluating measurement results as described in norm)
- cameraUSBPort=0 (ueye camera USB port. In case, there is only one camera, cameraUSBPort=0. If PC contains webcamera or other connected camera, cameraUSBPort=1)
- eurothermSlaveAddr=2 (Eurothermu slave address, which is set in Eurotherm controller. Don't need to be changed)
- eurothermPortName=COM1 (Eurotherm COM port)
- Create alias for start.bat
- create alias of start file Marklar/start.bat
- set icon of this alias to Marklar/logo.ico
basic information for user
First steps after program is launched:
- Select sample (or create new one) - for this purpose, use left part of graphical interface
- Select experiment (or create new one) - for this purpose, use middle panel of graphical interface
- Experiment details (incl. its controll) will display on the right
Sample creation:
- Each sample has its uniquie id. In addition to it, you can set its name and add description. Each of this can be changed later.
Experiment creation:
- Each experiment contains operator name and description of experiment. Both of these can be changed later
- Each experiment contains further
- Start temperature (temperature, to which furnace starts cooling/heating, when measurement is started)
- End temperature (when this temperature is reached, measurement ends automatically)
- Temperature toleration (allowed temperature tolleration when temperature stabilizes - this is used when reaching start and end temperature is checked)
- Readout interval (time interval for reading data from controllers)
- Persist interval (time interval for persisting measured data to database)
- Result correction (in Settings -> Callibration -> Result Callibration is defined correction table for measurement result. If Result correction is checked, the result temperature is corrected based on the correction table. For more details, look at final section describing Settings in more details)
- Default values of these parameters can be defined in Settings -> Experiment
Experiment Logic:
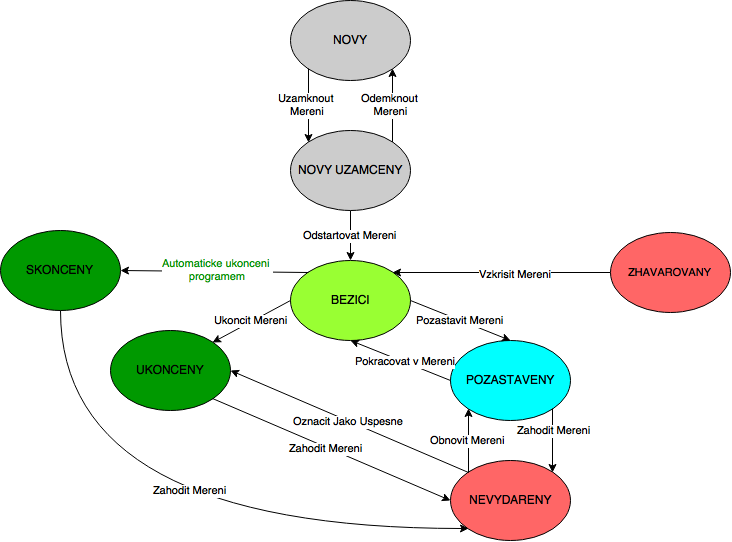
New:
- Newly created experimnt, which settings (start temperature, end temperature,...) can be changed
Locked:
- Settings (start temperature, end temperature,...) can't be changed furhter
Running:
- Experiment activelly uses LBM. Measurement alone consists of several phases (furnace preparation, temperature stabilization, sample measurment on temperature ramp), which are described furhter.
- In this phase, only one experiment can be active at given time.
Ended:
- Experiment, which ended automatically by program itself (either end temperature was reachod or change of sample dilatation > 1 mm/min)
- Experiment in this state is evaluate and result is included in overall statistics.
Terminated:
- Experiment, whichh was terminated by user by pressing "Terminate Measurment" button
- Experiment in this state is evaluate and result is included in overall statistics.
Paused:
- Running experiment, whhich was paused for a while.
- BEWARE, if thhere is some repeated error, when reading data from controllers, experiments changes its status to Paused automatically
Suspended:
- Experiment in this state is not evaluated and its result does not influences overall statistics.
Crashed:
- Something unexpected has happened and measurement cannot be restored.
Measurement
Measurement is divided into two phases
1. Preparation of sample and furnace
- When measurement is started, start temperature is written automatically and furnace starts to heat/cool to this temperature
- In order for measurement to proceed to phase 2, these conditions both must be fufilled
- Difference between start temperature and actual temperature is less than allowed temperature tolleration
- Sample is inserted in the furnace and its initial dilatation does not exceed the maximal allowed dilataion, which is definec in Settings -> Callibration -> Cammera Snapshot -> Maximal Allowed Dilatation
- If both conditions are met, the measurements will proceed to next phase by pressing button Start
2. Sample measurement
- During initialization of this phase, furnace starts raising its temperature by 5˚C / min.
- Measurement end, when one of the following is fullfiled.
- End temperature is reached
- Change of sample dilatation is > 1 mm / min
- User terminated measurement by pressing End Meassurement button
- Only the last of these steps is triggered by user. The others handles program by itself.
- When measurement ends, measurement is evaluated and furnace starts cooling to start temperature in order to prepare for new measurement.
Callibration
Callibration can be found in Settings -> Callibration. Callibration is divided into two parts - Camera Callibration and Result Correction
Camere Callibration
- The most imprtant parameter is Snapshot Height. This presents the length of the fibre, which goes through the overall height of the camera snapshot.
- One possibility to measure the Snapshot Height is to compare two camera images - each capturing fibre of different length.
Result Correction
- This presents result correction to known samples.
- If, for instance, "Cal1BR" is sample, for which the LBM measures temperature 601.5 ˚C, whereas tabulated value is 600 ˚C, then these two values should be written to the table.
Setting
Settings are divided into serveral tabs
- Experiment - experiment default values, which are coppied to newly-created experiment
- Connection - overview of devices and its components. This is only for test purposes.
- Temperature Correction - if termocouple in furnace is callibrated, write values from callirbation protocol to this table. Temperature will be then callibrated automatically.
- Callibration - see previous description of callibration
- Protocol - for now, there is no protocol